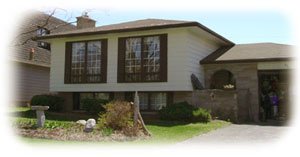
As our children have grown and moved out into the world on their own, our home has steadily grown to contain more workshop and studio space for Sawdust & Glass. Every time Jamie comes home for a visit the first thing he does is check every room in the house for “what’s new”. More often than not, he finds something has changed – just like you will if you visit our website frequently.
Upstairs Product Display Studio
Located on the main floor of the house, this product display studio was formerly part of the garage before being renovated into a sun room and now converted to the studio. The sunlight displays glass in it’s natural beauty.
Product Display Cabinet
We have created a number of product display structures that are capable of being setup at various sites. This cabinet has small pot lights to display the glass pieces.
Product Display Cabinet
The second half of the downstairs family room is a combination display area – when studio tours are being run in the Kingston area – and storage area for finished pieces to be sold elsewhere.
Stained Glass Workshop
To design and cut stained glass, Ann uses a light table, Glastar grinder, Morton cutting system and a lot of skill. She’ll sketch out designs on paper, rough cut them to fit and then grind to precision. The paper template usually ends up pocketed with water marks from the excess water from the grinder.
Stained Glass Workshop
Ann’s glass workshop contains hundreds of pieces of glass in a variety of colours and textures. Glass is purchased by the square foot in large sheets and cut to size depending on the piece being designed.
Kiln Workshop
The Duncan Pro-Boss Kiln was purchased at an auction in 2003 and has been running non-stop ever since. We have made or purchased several ceramic and stainless steel moulds to be able to produce a wide variety of beautiful creations. The majority of the ceramic moulds we get from a company called Lillinas Ceramics (613-386-7247). They have a very wide selection and their work is excellent. Give Lawrence or Lillian a call if you are in need of any moulds.
Kiln Workshop
Glass used for fusing must be kept separate from regular stained glass. If glass with different co-efficients of expansion are mixed in the kiln, they will crack. The rate of heating and cooling must be carefully monitored to avoid stress factures and on average a load in the kiln can take up to 18 hours from start to finish.
Soldering Workshop
Ron solders all of the stained glass projects in this area which is actually physically located in the main wood workshop. On average we go through anywhere from 3 to 6 one pound coils of solder in a month.
Welding Workshop
The sparks really fly when Ron gets started. He took an excellent course at St. Lawrence College with Ken Compeau to learn the trade as electricity can be very dangerous. We are beginning to experiment with metal in some of our products.
At one point in time there was a very spacious garage in this house but it got cut in half and originally turned into a sunroom. As our hobby of stained glass became a home-business we converted it into Ann’s design studio. The remaining part of the garage is currently also home to Ron’s welding gear. Currently I am using a Lincoln Welder and having a great deal of fun experimenting with metal.
Lathe Workshop
I used a General 160 variable speed electric lathe to create the bowls, lamps and other woodturnings up until April of this year. I purchased a new Powermatic 3520B lathe at that time. I collect burls from all over Ontario and on our travels. If you know of someone that has some unique wood or burls please give us a call. We would be , more than happy to work something out to acquire the wood.
Lathe Workshop
To turn the burls into finished woodturnings, Ron uses a variety of chisels. I’m sure you can imagine with all the burls he’s got stored away in here why the company is named Sawdust & Glass. I’m sure our house would fetch top dollar on the gerbil housing market 🙂 And a woodturner/woodworker can never have enough tools, There is always room for one or two more.
Wood Workshop
The central area of the workshop has several work stations – table saw shown above – on castor wheels to allow creation of projects big and small. It sometimes can be a bit of a logic puzzle as to the best place to position tools and any of the two or three projects seemingly always on the go. I have recently purchased a new table saw and will add the picture here once I have it cleaned off so you can see it.
Wood Workshop
All of the large tools Ron uses – the mitre saw, router table and oscilating sander shown here – are interconnected via a central dust collector. Despite his best efforts, Ron is still accused of tracking dust all over the house by other members of Sawdust & Glass. He even went so far as to paint the floor the colour of sawdust in hopes that those other members might not notice it as much. This was a good idea but didn’t work.
Wood Workshop
The woodshop in our basement formerly was a playroom, computer room and bedroom. When Christine went to university, a wall came crumbling down. The result of this “accidental deconstruction” was that Ron’s workshop now has MUCH more space available for tools and working on projects.
Wire Melt on the Go
Here is a picture of the kiln as it works its magic. The temperature now is about 1760degrees . You can see the pieces of wire with the glass on top and if you look closely you can see some of the melted glass below the very top one. On this firing, we are doing 3 smaller wire melts as an experiment to see if they will keep their round shape. We found that when all was done that the shapes were a little out of round and we will have to cut them into the circles we want and then refire to round over the edges. When we do the larger wire melts we can only do one at a time.
Birth of a Wire Melt
This picture shows the kiln as it is loaded for a wire melt firing. We are trying 3 small ones this time. Each piece of wire is supported by some fire bricks to raise it off the kiln shelf. The higher we raise it the more circular swirls we will get. Ann and I play with the height and arrangement of the glass to get different effects. Each one has about 650 grams of glass. We estimate that we will get circles in the 6″ to 8″ range. Time will tell.
Fusing Some Glass
This picture shows how we load the kiln for a fusing firing. Here we have several layers of glass on top of each other. Glass as it fuses moves to a thickness of 1/4 inch so if we wish to retain a shape it is important we have 1/4 inch of glass in layers. The glass must also have the same co efficient of expansion ( e.g. 96) so stress fractures don’t occur as it cools and contracts at different rates. We will heat the kiln to 1465 and the layers of glass will melt together but they will not (we hope) expand and touch the piece beside it. Once we have the glass fused to what we call “lake smooth” the kiln is stopped and allowed to cool for 12 hours. Once the kiln has cooled, we can take the glass out and the larger pieces will be placed onto ceramic moulds to be slumped into their final shapes. Some of the smaller pieces are for jewellery and will have the findings placed on them ready to be packaged.
Second Layer in the Kiln
This photo shows how we utilize the kiln to best advantage. The bottom layer is in and we have added the stilts and another set of ceramic shelves to hold this load of glass. So we are almost ready to begin heating the kiln. We just need to add a final set of shelves and the last load of glass. Some of the small squares, you can see here, will become pendants while the really tiny ones are destined to be earrings.
Third Layer
In this photo, you can see the third layer has been added. We are now ready to begin the firing. We heat the kiln slowly for the first 500 degrees and then we can crank it up until we reach 1465 which takes about 3 to 4 more hours. Once the fusing is finished, we leave the klin closed until the next morning. In this photo you can also see the first and second layers.
Lathe Workshop
My new lathe arrived in Ottawa on Tuesday and John Lisk and I went up there to pick it up and bring it home. Tom met us here and using a heavy duty dolly we got all of the bits and pieces down into the basement without injury to ourselves or the lathe. We used Tom’s motor table/hoist to put the “ways ” or bed of the lathe on as it’s the heaviest piece and then cranked it up so the legs would fit underneath and then we attached everything. It is now wired and running very nicely, it is really solid and is very quiet. I made a shelf for under the lathe and I have 3 large bowl blanks waiting to be cored. These ones are about 20″ in diameter.
This is probably the tidiest you will see the shop for quite a while. I am sure that Ann will be very pleased with this new addition to the basement when she returns from her trip to visit relatives in Holland and do a bit of cruising on a ship around Italy and Greece.
Lathe Workshop
This is my new coring system from Oneway. With this unique tool I can make several bowls from the one origianl, thus saving a great many bags of shavings and giving me many more bowl blanks to work with